A new central air conditioner can run like a whispering, efficient machine or a noisy money pit. The difference often comes down to how it’s installed. This guide walks you through the full process, from the first knock on the door to that final, cool, dry sigh from the vents.
Note before we begin: air conditioner installation is not a DIY project. It involves pressurized refrigerants, electrical work, open flame brazing, and code compliance. Licensed pros have the tools, training, and insurance to do it safely and up to spec.
Planning the Project
Modern condensers are often taller and wider than older units. That can affect placement, clearances for airflow, and even the pad size outside. It may also require relocating the outdoor unit a few inches or to a different side of the meter, depending on local code and manufacturer spacing guidelines. The payoff is worth it: newer systems tend to run quieter and sip less energy when everything is sized and placed correctly.
Inside, the evaporator coil that sits on top of the furnace (or below, in some configurations) might be taller than the one coming out. That can trigger minor sheet-metal updates to the supply plenum. A good estimator flags these early so the installation team shows up with the right parts, fittings, and plan.
What Happens During the In-Home Estimate
The estimator documents the existing system, access constraints, electrical panel details, line set routing, drain options, and duct connections. If a crane, pump-down equipment, condensate pump, or additional safety devices are needed, they will be specified now. This visit is about removing surprises so installation day is smooth and on schedule.
The Day of Arrival and Safety Setup
Expect a call or text on approach. When the crew arrives, the lead installer reviews the scope with a simple job packet: model numbers, accessories, and any notes from the estimator. Meanwhile, floor protection goes down, tools get staged, and power to the HVAC circuit is switched off. Gas to the furnace is turned off as well if any work could bring an open flame near the cabinet. It’s a quick pause that prevents costly mistakes and keeps the work zone clean and safe.
Recovering Refrigerant and Disconnecting Power
A certified HVAC technician recovers the refrigerant from the old system using dedicated recovery equipment and tanks. Venting refrigerant is illegal and bad for the environment. Once pressures are at zero and lines are safe to open, the team disconnects wiring at the outside service disconnect and removes the flexible conduit, often called the whip. Many pros replace the disconnect and whip during a condenser swap for reliable electrical safety going forward.
Prepping the Outdoor Pad and Area
The new condenser needs a stable, level base. Installers commonly replace old or sunken pads and rebuild the area with compacted gravel for drainage and leveling. Composite pads are popular because they’re light, durable, and better at absorbing vibration than poured concrete. A level pad is not just a neatness thing. It helps fans and compressors operate smoothly and reduces noise.
Removing the Indoor Coil and Line Set
The indoor evaporator coil connects to the duct just above the furnace. Access can be tight in closets and finished basements, so installers remove or modify the existing plenum to slide the coil out. Next comes the line set, consisting of the two copper tubes that carry the refrigerant.
If the lines are accessible, the best practice is to replace them. Older systems used different oils that don’t play well with newer refrigerants, and reusing lines without proper cleaning can shorten system life. If lines are buried in walls or slabs, pros can flush, pressure test, and reuse them when replacement isn’t feasible. New is better when practical.
Installing the New Evaporator Coil
There are two styles: cased and uncased. A cased coil arrives in a matching insulated cabinet designed to sit on the furnace. That makes alignment, sealing, and future service easier. Uncased coils require field-fabricated support rails and a carefully built plenum face to match the coil opening.
The plastic drain pan on any coil needs safe clearance above the furnace heat exchanger so it doesn’t overheat. The goal here is airtight, well-supported, and level, with a clear path for condensate to exit.
Running the New Refrigerant Line Set
The line set comes as a paired bundle: a larger insulated suction line and a smaller liquid line. Installers route it with gentle bends, secure it every few feet, and keep it away from sharp edges. Where metal straps touch copper, they add isolation to prevent galvanic corrosion over time.
The penetration through the rim joist is typically 2 to 2.5 inches, sealed later for weather and pests. Inside, the lines track neatly along joists or beams toward the coil, with slack managed to avoid stress on fittings.
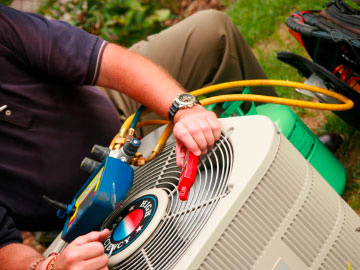
Setting the Condenser and Making Connections
The new outdoor unit is uncrated, inspected for transit damage, and set on the leveled pad with proper side and top clearances for airflow. The service valves on the condenser are kept closed to protect the factory refrigerant charge. The installer cuts and dry-fits the line set to the valves and the indoor coil, then it’s time for the craft work: brazing.
Brazing with Care
Brazing is a high-heat welding process that uses an alloy rod to join copper to copper and copper to brass. Installers shield sensitive parts with wet rags or heat-absorbing paste to protect valve seals and the metering device inside the coil. A steady sweep of dry nitrogen flows through the tubing while they braze. That prevents scale from forming inside the lines, which can clog tiny passages later.
After joints cool, a filter drier goes into the liquid line, usually near the coil, to absorb moisture and capture debris. It’s a simple part that does a lot of unseen work.
Pressure Test and Vacuum
Before any refrigerant is released into the rest of the system, the new piping is pressure-tested with dry nitrogen and monitored for a solid hold. Then comes evacuation.
A dedicated vacuum pump, large hoses, and a micron gauge pull deep vacuum through the lines and coil, removing air and moisture. Many techs target 500 microns or lower and confirm it holds. This step is the difference between a system that runs sweet and one that forms acids inside and fails early.
Releasing Refrigerant the Right Way
With the vacuum verified, the technician opens the suction valve first, then the liquid valve to break the vacuum with refrigerant, protecting the clean, dry interior of the system.
Hoses are removed only after the refrigerant is flowing and caps are tightened to factory torque. That sequence preserves the factory charge as much as possible, with any fine-tuning handled during commissioning.
High- and Low-Voltage Wiring
A new outdoor disconnect is mounted at a reachable height near the unit. Depending on the panel breaker and manufacturer specs, the disconnect may be fused or non-fused. Line wires from the panel land on the “Line” lugs, and the whip to the condenser lands on “Load.”
Low-voltage control wiring runs from the furnace control board to the condenser to signal calls for cooling. All connections are made per equipment diagrams and electrical code, with tidy routing and strain relief.
Condensate Drain and Safety
The primary condensate drain comes off the coil’s main port and runs in PVC to a floor drain. If no drain is nearby, a condensate pump lifts water to a proper discharge point. Traps and cleanouts help with service, and a float switch at the secondary port can shut the system down if the drain backs up. That little switch has saved more finished basements than most people realize.
Thermostat Setup and Controls
Some projects include a new thermostat, especially when upgrading to a two-stage or variable-speed unit. The AC installation service lands the correct wires, configures system type and fan settings, and confirms accessories like dehumidification or ventilation, if applicable. If keeping the existing stat, it gets reconnected and checked for proper staging and fan control.
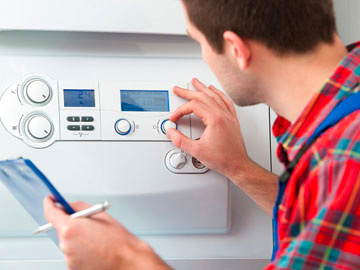
Startup and Commissioning
Now for the part that separates a quick swap from a well-tuned system. The home needs some heat load so pressures and temperatures are meaningful. Running the furnace for a short bit is a common trick if the space is too cool. After 15 to 20 minutes of cooling, the technician records data points that tell the story of the system’s health:
- Suction and liquid pressures, along with line temperatures, are used to calculate superheat and subcooling
- Outdoor and indoor temperatures, including wet-bulb, for accurate charge assessment
- Return and supply air temperatures to determinethe temperature split
- Static pressure measurements on supply and return to gauge airflow
- Motor amperage on the compressor, condenser fan, and indoor blower
- Notes on line set length, coil elevation relative to the condenser, and any added refrigerant
If anything is out of range, adjustments happen now. Charge is trimmed by weight or by performance targets. Blower speeds are adjusted for proper airflow. This is also the moment to listen for noises, check for vibration, and scan braze joints with an electronic leak detector.
Weather Workarounds that Pros Use
Rain in the forecast? Crews often stage indoor tasks while a passing shower moves through, then set the condenser during a dry window. In winter, there are tricks for testing cooling mode when outdoor temperatures are low, though it can add time. The key is sequencing tasks so the system ends the day tight, dry, and dialed in.
Final Sealing and Details
Outside, the wall penetration for the line set is sealed against air and pests. Line insulation is taped and protected with UV-resistant covers where exposed. A locking cap is added to the service ports to reduce tampering and theft. Labels go on disconnects. Inside, the coil cabinet and plenum seams are sealed for airflow and cleanliness.
Cleanup and Walkthrough
Drop cloths roll up last, so debris stays contained. Old equipment and scrap leave with the crew. Expect a walkthrough that covers what was installed, filter sizes, how to change thermostat settings, how the condensate safety works, and recommended HVAC maintenance intervals. It’s also the time to discuss warranty registration and any tune-up plans.
How Long Does It Take?
Most straightforward replacements finish in a day with a two-person crew. Add time for tight access, rerouting a line set, building a new plenum, or electrical panel updates. The aim is not speed at all costs, but doing each step right so the system delivers comfort and efficiency for the long haul.
Common Pitfalls Pros Avoid
- Reusing an accessible old line set that contains incompatible oil
- Skipping nitrogen during brazing and creating internal scale
- Rushing evacuation and leaving moisture in the system
- Ignoring plenum sizing and starving the coil of airflow
- Neglecting fused protection when the breaker size exceeds the equipment limits
- Forgetting the float switch or trap on the condensate line
- “It blows cold, we’re done” in place of a real commissioning
The Payoff of a Thorough Install
A good installation feels almost boring in the best way. The condenser hums softly, ducts don’t whistle, rooms hit temperature without hot-and-cold swings, and the energy bill looks better. The machine hasn’t changed on paper, but in practice, it’s an entirely different experience when the details are right.
What to Expect from a Quality HVAC Installation Provider
- Clear scope before work starts, including any duct or electrical changes
- Crew introductions, floor protection, and a tidy work zone
- Proper recovery of refrigerant, new disconnect, and whip if needed
- New line set when accessible, with clean brazes and nitrogen purge
- Micron-verified evacuation and documented commissioning numbers
- Condensate protections and labeled electrical
- A clean space and a clear owner tutorial before they leave
K & K Heating and Cooling: Family-Owned HVAC Pros Serving Northeast Ohio
Air conditioning is comfort tech, but it’s also a chain of small decisions and craft steps that add up. Pick a team that treats installation like the main event, not an afterthought.
At K & K Heating and Cooling, we keep homes and businesses across Northeast Ohio comfortable with friendly pros, tidy work, and honest options. Locally owned and family operated, our team installs and services all major brands, offers financing through Wells Fargo with promotional options, and backs most repairs with a 1-year parts and labor warranty.
Request a free quote to compare packages, receive a comprehensive total home comfort evaluation, and select the option that best suits your needs. Prefer savings today? Check current specials and schedule fast service with NATE-certified technicians who aim for same-day repairs when parts are available. No pressure, just clear choices and a 100% satisfaction guarantee on new installs.